The More You Know The Less You Know

dscn3987

Woven bag: My first weaving project

You see an art or craft that looks relatively easy and fun to do so you give it a go.  Then you get into it and soon discover that there is so much more to learn and various avenues to pursue to gain more knowledge.   It’s a continual learning process and as with most art forms, it is usually a case of 10% inspiration and 90% perspiration to become really proficient at any creative discipline.

I was reminded of my creative journey into tapestry recently when I received a craft catalogue in the mail.  One of the products was an easy weaving kit.  This brought back the memory of how I started learning to weave that ultimately led me to study tapestry design.

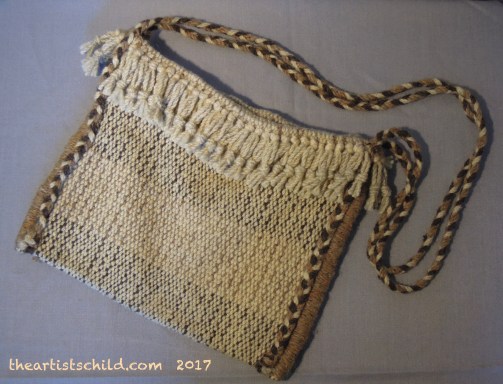
In an old set of 1970s magazines called Golden Hands I saw instructions on how to make a frame loom to do simple weaving projects.  It peaked my interest enough to want to make the loom, which I did.  My fist project was a woolen Greek style bag, made by folding the woven fabric, sewing up the sides and knotting the warp threads to form a fringe at the top.  I attached plated shoulder straps.  It turned out quite well for a first project, but because I drew and painted, I wanted to learn how to do my own imagery in woven tapestries.

This involved more research and I bought a basic book to learn how to weave tapestries.  I modified the loom so that it was now a simple frame that I could use vertically with a clamp, rather than horizontally and bought a metal dog comb to beat down the weft threads, as recommended by the book.  At first my attempts were quite amateur because I was using a very basic technique and needed to learn more sophisticated methods if I was going to improve.

Luckily I saw an advertisement for classes at a local tapestry workshop and enrolled in a short course.  This was really helpful as it taught the methods used by the workshop and my weaving improved greatly.  I ended up doing a more advanced course there and I was hooked.  I was now able to weave from my own designs and the final results were much more proficient.

dscn3974

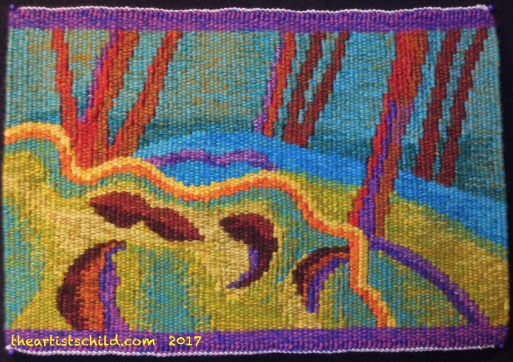
Tropical Rhythms: My first tapestry after completing the short courses

Ellie was also interested in textiles and I taught her what I had learned and she also got the tapestry bug.

But I still wasn’t satisfied and felt that I needed to learn much more to become highly skilled in tapestry design and production so, as previously mentioned in this blog, Ellie and I both enrolled in an Art course where we could major in tapestry.  It was a very practical course and we were constantly challenged to develop our skills and learn many new techniques.

From textures to interpreting complex designs, we had to continually stretch ourselves so that nothing was impossible to weave and were encouraged to develop as visual artists.  We took part in workshops with master tapestry weavers, both local and from overseas.  We learnt textile technology and how to dye wool, as well as occupational health and safety so that we did not poison or injure ourselves.  The only downside of doing a course is that sometimes you must do projects that do not always interest you creatively and this can take away some of the enjoyment.  But if you want to do this professionally you must learn that there are times when you might need to make compromises.

The course was quite intensive and after I graduated, I had to take a break from weaving. So did Ellie.  I have been doing other creative things, like drawing and painting, as well as music, but now I feel that I want to get back to creating small-scale woven tapestries and rediscover my love for the medium.  All because I received that catalogue in the mail.

What begins as a simple creative pastime can turn into a complex adventure.  To become really good at any creative discipline takes a lot of hard work and dedication.  It helps to have a never-ending thirst for knowledge, as there is always more to learn.  And even if, like me, you take a break and do other things, you can always return to your earlier passion with a fresh viewpoint.

Kat

Getting into the Goldilocks Zone

dscn3902

The Goldilocks Zone

We’re in the middle of a heat wave and it is affecting my ability to think.  For two days I have been trying to write a post but I keep getting bogged down with detail and too many facts.  Exactly what I want to avoid.  I am trying to write about how finding your creative outlet is not always a straightforward process.  You try an art form that looks appealing but, like Goldilocks first found, it is not quite right and you need to move on and find something that will give you enough enjoyment and passion to persist.  But our struggling old air conditioner is either not coping with the heat or making it too cold and it’s numbing my brain.  I am definitely not in the “Goldilocks Zone”.

The Goldilocks zone is a term used to signify the habitable region around a star where an orbiting planet can support life, that is, it is not too hot or too cold but just right.  Well I’d like to be in that zone because it is not “just right” at the moment.

But when is it ever “just right”.  Often we put off doing something because it is “not the right time” or “it will be better tomorrow” or “I must do this mundane thing now so I’ll put off what I’d love to be doing till later”.  Well maybe “just right” is “right now” and I should devote some time to drawing or playing the ukulele.   Yes, I don’t think that I have mentioned that I love the uke and it is one of my passions along with singing.  Its feel-good tone makes me happy and lifts my spirits and I love writing songs on the ukulele, even more than on the guitar.   It is definitely something to get me into the Goldilocks zone, along with using water-soluble pencils and pastels, creating assemblages in the garden or playing ball with our dogs before it gets too hot and they collapse from heat exhaustion.  There is no time like the present to get into that zone so don’t delay.

If you have not yet found your true passion, it pays to experiment with different art forms to find one that is “just right”.   Sometimes it takes time.  I have tried various forms of creative activities and not all of them have worked out as expected.  At art school I decided to do ceramics as an elective because my mother had once done this as a hobby and she still had the pottery wheel and small kiln.  I thought that this would be great to try.  But it wasn’t meant to be.  I found the process too time consuming and lost the desire to continue after a year of constant breakages.  Usually my best work was damaged during the drying stage and I was always redoing projects.  I was not cut out to be a potter.  Too stressful.  We ended up selling the wheel and kiln to someone who really loved the activity.

dscn3914

Japanese Garden 1: Tapestry Design and Sampler

Sometimes you discover your true passion through doing some other art form.   From an interest in textiles I had taught myself tapestry weaving and did a short course to learn more.  I really enjoyed creating something out of thin air and decided to take it to the next level.  The Art School I attended offered this as a major and I was able to learn how to design and create woven tapestries in both small and large-scale format.  I became quite skilled at this process and always received good grades, with a distinction in my final year.  But I found the thing I liked the most was doing the drawings or painted designs for the tapestries and developing my own visual style.  While I still like tapestry, I prefer the immediacy of drawing and painting which were my first loves.  Getting experience in different creative areas will not only help you to find your bliss, but will give you insights into all kinds of art forms and it is never a waste of time to learn something new.

For me, playing music, as well as drawing and painting, get me into the Goldilocks zone.  If you haven’t already, it may take a while to discover what does this for you, but in your search you could find yourself taking interesting paths and deviations that is part of the joy of the creative journey.

Kat

Costume Parties: One Person’s Heaven, Another Person’s Hell

dscn3744-1

It’s nearly New Year’s Eve Party time.  Some people spend weeks making costumes for such an event,  while others won’t even wear a silly hat.  It seems that while many party guests love to dress up and pretend to be someone or something else, there are those who refuse to make any effort at all.

I have noticed that those who do not attend in costume often end up feeling left out and don’t have as much fun as the party goers who have embraced the theme.  Maybe some people have a costume phobia because of some tortuous experience in childhood or early adulthood.  If you are going to a party this weekend, for the reluctant participant I have made the following list of recommendations that should help anyone survive an event that requires a costume.  Some of these things are from personal experience and I still like to dress up.

  1. Never wear anything that you cannot sit down in. Eg. A Christmas Bon Bon outfit made of cardboard and crepe paper is a bad idea.
  2. Following on from point 1, never wear anything made in one piece that requires removal to go to the bathroom.
  3. It is best to avoid costumes made from crepe paper altogether because, firstly, they are a fire hazard and secondly, if it is humid or wet this will become droopy and colors may run down your face.  Eg. when your mother made you a crepe paper flower costume and it wilted like a real flower in a heat wave.
  4. Never wear anything that you do not want to be caught in if your car breaks down or if you are locked out of your house. Any realistic characters with a fake gun are probably not a good idea.
  5. Never wear anything that blocks your vision, prevents you from eating and drinking, or is so hot that you can only have your underwear underneath and cannot take it off when you go into a melt down. Even if they look cute, full furry animal costumes are a big mistake and should be left well alone.
  6. Never substitute indelible felt pen for make-up or use red or black grease paint. These will require industrial strength cold cream to remove.
  7. Never wear anything that is a hazardous to others.  Eg. Pipi Longstockings style plaits with a wire core can be dangerous for anyone sitting next to you.  Unless it’s someone in a Captain Hook costume.  They’re already wearing an eye patch. But the damage you could do on the dance floor does not bear thinking about.
  8. If you travel to a summertime party and it is still daylight, never drive through the city centre wearing an 18th century style wig and dress. You will cause a spectacle when stopped at traffic lights and it is impossible to hide.  Maximum embarrassment will result.
  9. Clown costumes were never a good idea, even before the creepy clown epidemic.
  10. If you disregard the above points, you are probably a masochist or an extreme exhibitionist.  So no sympathy when it all goes pear-shaped.

Now that you are aware of the pitfalls, it is possible to come up with some reliable costume ideas.  What follows are some costume suggestions for both those who love to dress up and for those who are more hesitant.

If you cannot sew like me, collect clothes that can be turned into a character just by using a bit of imagination (Op shops and weekend markets are good sources).  You can then reuse or reinterpret favourite costumes and keep them stored away in a wardrobe or vac-packed, so that it is never difficult to find something at short notice.  For example, my several long velvet dresses have been used to create Queens, Medieval ladies and witches, depending on the occasion.  One of my favorite characters from both film and TV versions, is the evil Queen in Snow White and the Seven Dwarfs.  She is just so nasty, has all the best lines and is a perfect character for a party costume.  Much more fun than dressing up as Miss goody two shoes Snow White.   I have a blue velvet kaftan dress that looks quite medieval and very “Evil Queen”.  All I have to do is put a glittery black knit top underneath, add some gold chains and a fake jewel, a black veil and a (cardboard) jewel encrusted crown and I have a great costume for colder weather. “An Apple, my pretty?”

The Crown was created by cutting out the shape from a cardboard base.  This was covered with fabric and was then covered with gold paper that had cutouts left to reveal the underlying material.   Stick on Velcro was used to fasten the ends of the crown together, and it was decorated with glass gems. Took a bit of work but I think that it looks very regal and can be used more than once.

You could make a King costume using the same principles.  A turtle neck top worn with slim black pants (tights if you dare) under some kind of robe or cape, with a similar crown, some chains around the neck and a prop sword and you could be King Arthur, Aragorn or if you like the dark side, the horrible King Joffrey from Game of Thrones, who has some great lines and an over the top death scene as inspiration.

For a warm weather costume the versatile standby is a fairy outfit, which has endless permutations.  All you need is a light party top, a skirt made from transparent or flowing material and some wings, which can easily be found at a $2 shop.  I have some glittery white ones.  I put these over a red, white and black chiffon style top that has long flowing sleeves.  For a skirt I use a couple of white half-slips, the top one being made of transparent net.  In my hair I put some cerise artificial flowers that I sewed to a large hair clip.  Attached to the flowers is a copper-colored butterfly for a bit of whimsy (for the purpose of the photos I have used a particularly itchy wig mistakenly bought from a party shop. This type of thing should have been on my warning list, along with feathered masks that make you sneeze).

With such a costume, you can be the Fairy Godmother from Cinderella, the Good Fairy from Sleeping Beauty or if you like, the Bad Fairy.  Just do everything in black.  And as for you men out there, I have seen many a brave male in a fairy costume.  But if this is not your thing, there are always wizards or elves, the main requirements being a pointed hat and staff for the former and pointy ear attachments for the latter (and a loud voice and predilection for poetry).

If you can, it is also fun to create your own costume character.  Ellie and I are sci-fi fans and for a local art group’s New Year’s Party we designed and made Space Alien costumes.  Ellie, who can sew, used metallic gold fabric to make tabards (medieval term for open sided tunic) with art deco inspired padded shoulder extensions, requiring a lot of polyester stuffing material.  We made black satin belts that fasten with Velcro and attached a gold painted cassette tape to each to simulate some kind of power pack.  The tabard was worn over black cotton camisoles and black leggings (I had to use a long skirt in the photos as the dummy does not have legs).  We carried plastic ray guns that made a whirring noise.  On our heads we wore sparkly gold wigs from a $2 shop.  These don’t itch.  We both won a prize for our costumes and had a lot of fun being silly and quoting clichéd lines from sci-fi movies, Star Trek and Dr Who.

These types of sci-fi costumes work well for both men and women. They can also be adapted for colder weather with a long-sleeved top underneath and warmer pants and boots.  Also good outfits for a group.  You can pretend it is an Alien invasion.

There are plenty of costume ideas that are imaginative and comfortable to wear, so you should be able to find or make something that will ensure that you have lots of fun, without any major costume malfunctions.

If you are going to a New Year’s Eve party I hope that you have a wonderful time.  I think that we all want to say goodbye to 2016.

Happy 2017

Kat

Party Costumes: When at First You Don’t Succeed

As you have already heard from this blog, Kat and I have been invited to a “Gangster and Moll” birthday party.  My character will be Blanche Barrow, the sister-in-law of Clyde Barrow of Bonnie and Clyde fame, and her style dress shall be different from that of Bonnie Parker, Kat’s character.

Now like my sister I do not want to go in the expected costume of a 1920s “flapper”, dressed in masses of fringing or sequins.  It is just not my style.  Instead of going out to hire or buy a party costume, I have created a unique costume by combining key pieces from my wardrobe in a way that reinterprets the silhouette of the period.

The Costume

For this occasion I have combined a blue, floral patterned velvet cardigan over a plain maroon ankle length skirt.  To accentuate the skirt and hips I have wrapped an Indian velvet scarf, around the top of the skirt and pinned it together with an oval brooch at the front to form an overskirt with two overlapping floral panels.   For my jacket I have been inspired to select one from my collection of Japanese haori.  It is a soft pink/violet with a small, stylised floral pattern of white and grey flowers.  The kimono shape was fashionable during the 1920s and early 1930s.  To bring it all together I have accessorised with a violet, embroidered floral shoulder bag to match the skirt.  I have also made a headpiece using ribbon, diamantes and feathers to truly get the look of the period.

The Headpiece, Plan A & B

It seemed like such a simple task. Make a small headpiece to look like a 1930s lady dressed for a night in a speakeasy.  This was my chance to be creative.  I could make the headpiece from materials that I already had and would not need to spend a lot of money.  Just in case I did not have the correct fixings at home I went to a large chain store specialising in sewing and haberdashery items to buy some basic construction materials.  I was playing with the idea of making a small rosette or panel on which I could fit some sequins or beading and feathers.

I purchased a headband with a woven straw disc, a fancy diamante trim to make the headpiece “sparkle”, 2 packets of white feathers, some circular fabric discs to fix the feathers to my selected base and some metal hair clips to fix it to my hair.  At home I found some pieces of scrap material, blue taffeta silk and a patterned floral silk in blue, pink, green and white.  These would match my costume.  I also had some interfacing and Tacky Glue.

I soon realised that the headband and the round straw disc were the wrong shape for the diamante trim and too big for my hair.  I decided to move to Plan B.  Six layers of interfacing were ironed together and cut in an oval shape slightly wider than the diamante trim.  The floral silk was cut larger than the oval base, centred and glued to the back of the interfacing.  I then sewed a line of stitches around the outer edge of the loose fabric and gathered it in the centre to form a ruche on the front of the disc.  Decorative ruching was popular during this period.  Next I stitched a metal hair clip to the back of the oval panel.  I glued the white feathers together using between two of the white fabric discs as I planned to glue them to the front of the fabric then attach the diamante trim on top.  Before doing these final steps I experimented with how it would look in my hair.  It did not work.  It looked terrible.  My hair is too curly and wild and it would not stay in place.  I decided I needed another solution and not waste any more time on this idea.

The Headpiece, Plan C

Back to the notions box in the studio and with much rummaging I found two violet satin ribbons in a paper bag.  They were good quality and already were tied in bows.  I think I must have saved them from packaging, where sheets or linens were tied up in pretty bows.  After trying one ribbon on my head to see if it would fit, it did, I found the size of the bow was perfect to fit the feathers and the diamante trim.  I first sewed the fabric disc holding the feathers to the front of the bow, with the diamante trim sewed over both the feathers and the bow.  Voila!  Finally I had the perfect headpiece for my costume.

Making this headpiece reminded me that there is more than one way to be creative.  You can carefully plan your project from the start, so that you have everything worked out so that you save time, money and effort.  You can also work more freely as I did and make it up as you go along.  The important point with both methods is to recognize when an idea is not working and that you sometimes need to go through the design and construction process and fail before you can find the right solution.

My costume is now complete.

Ellie

Creative Dressing: Summer Party Jackets

This year in Victoria the hot weather has been a long time coming and everyone is relieved to be finally ditching those winter clothes.  In Australia we have the advantage of end of year holidays in the warmest months when we can wear our summer finery.  Dressing up for summer parties can be expensive and it is good to have items that can be used in different combinations so that they last for more than one season.  In Melbourne there is also the unpredictability of the weather that makes choosing an outfit tricky.  You never know when a cool change will make the temperature plummet from above 30 degrees to the chilly teens.  A great solution to this dilemma is having a summer jacket to go over your lighter clothes.

I have been collecting these types of jackets for several years and switch them around with different tops and skirts to create new looks.  This has saved lots of time and money and reflects my own style of dressing.  Vintage Japanese Haori jackets are among my favorite pieces.  I bought a couple of these at a Japanese store in Melbourne, and while not dirt cheap, were great value because they are beautifully made and each is unique.  I also have several less expensive Indian made jackets: one floral Haori inspired; two identical made of lace in black and green; and a black sheer one.

I like to mix these jackets with vintage clothes and accessories and newer items for my own individual look.  I have a black contemporary skirt that goes with different tops under all the jackets.  For a 60s look I wear the skirt with a vintage black sequined top and a 1930s bugle beaded necklace both inherited from a relative.  This looks great under the red and black 60s Haori.  If I want to appear even more colorful, I wear the red floral Haori with a camisole top and the skirt and accessorize with a Chinese enameled buckle belt and Venetian glass beads, souvenirs from overseas trips.  For a cooler look I put the same top and skirt under the Indian floral Kimono jacket, together with a black leather belt and a Scottish green enameled pendant.  Combining clothing and accessories from different cultures and eras in the one outfit creates visual interest, as well as being fun.

The lace and sheer jackets completely change the feeling of the skirt and top.  For that little black dress effect I wear the black lace jacket with the leather belt and a vintage bead necklace found at the op shop.  Switching to the sheer black jacket creates a different outfit, especially when you add a chunky colorful eighties necklace and the Chinese enameled belt.  For a softer look I replace the jacket with the green lace version and wear this with a floral Indian top, tied with a matching sash and the Scottish enameled pendant.

There are many more ways that I can wear these jackets.  Putting them with a longer skirt or with pants allows many different combinations. Then there are the endless changes that can be done with various accessories.  Sticking to a base color like black means that you can get away with buying a few good quality shoes and bags that make an outfit appear stylish.  I see these jackets as pieces that I can keep for years, as they are timeless classics and do not get the same amount of wear as everyday clothes.

If you want to do something similar you can find suitable vintage jackets at local recycled clothing stores and on the internet.  You might be lucky and find one at an op shop or a Sunday market.  For new items there are ethical Indian clothing stores to be found at major shopping centres and on-line (like Tree of Life and Ishka ).  Just buy what appeals to you and develop you own individual sense of style rather than following fashion fads.  After all, what we wear is another form of self-expression and it makes you feel good to dress for yourself.

The following is a link to an Australian website where you can buy genuine Haori jackets:

japanmade.com.au – Haori page

Kat

Getting creative with Fancy Dress Costumes

Now that we are heading into November it’s time to celebrate. In Melbourne we have the contrast of the autumn festival Halloween and the spring racing carnival.  The Melbourne Cup is next Tuesday, straight after Halloween and lots of people like to dress in costume for both events.

We are not attending any racing or Halloween celebrations but a mutual friend is celebrating a major birthday at the end of November with a Gangster and Gangster’s Moll party theme.  In the past we have made some elaborate fancy dress costumes for parties, but Ellie’s sewing machine is broken and needs mending.  This will leave little time to do anything complicated so we will have to improvise.

Most of the female Gangster costumes available on line seem to be based on the 1920s flapper fashions, or on male gangster pin striped suits and felt hats. The well-made versions are quite expensive.  As I am more of a fan of 1930s fashion I thought that it would fun to use Bonnie Parker as inspiration for a costume, because I already have suitable clothing in my wardrobe.  The real Bonnie Parker favored dark colours, as opposed to Faye Dunaway’s pale clothes in the 60s movie.  What I have put together could easily be used for a Halloween “witchy” outfit with a few adjustments.  Ellie is still thinking about her costume but will wear something similar but with more colour.

bonnie_1

Bonnie Parker

I’m going for an overall 1930s look, not historical accuracy and will wear the following: a bias cut black skirt with uneven hemline; a black lace three quarter sleeve blouse; a long sleeve black cotton knit top; a black beret; black low heeled court shoes; a velvet bag originally found at the op shop; a vintage crystal necklace and a pair of Art Deco style black enamel and diamante earrings.  It could be warm at the end of November so the outer top can be removed as necessary, although given recent Melbourne weather, summer is still several weeks away.

The buttons on the knitted top need replacing because these are too small and keep popping open.  We have a collection of old buttons and have found some larger black cut glass ones that should do the trick and look more appropriate for the era.  As you can see from the photos, I also have a wig.  I might wear this but only if the weather is cold because I always end up taking it off when I become too hot.  Otherwise I will go with curly hair.

I will try to imagine myself as a frequenter of a gangster run speakeasy during prohibition in the early 1930s.  We have been asked to help with some group musical performances and can sing and play Bonnie and Clyde on the guitar, as well as All That Jazz.  It should be a fun party and I’m sure there will be a lot of hilarity with plenty of potential for overacting our parts.

Don’t panic if it’s too late to order or make a costume for parties and celebrations.  With some creative thinking you can use clothes that you already possess and come up with a suitable character for any occasion.  If you are having problems there are plenty of last minute suggestions on the internet and below is a link to a website that has many helpful DIY costume ideas.

37 DIY Costumes You Already Have In Your Closet

Kat