This post began with a hole in the wall but more on that later.
New Year is rapidly approaching. At this time of year I love to light candles, which can symbolize, peace, hope and wishes for a new beginning, as well as remembrance of what has gone before. Candles also give a relaxing atmosphere to the home, especially if they are scented and can also repel mosquitos outside (citronella and lemon grass). Having candles on your table will make even the most basic meal feel special.
Candles are beautiful decorations for any celebrations. With the lighting of candles also comes the responsibility of avoiding any type of fire. Outside when it windy or there is a day of Total Fire ban, it is wise to put candles in an enclosed container, like a tulip shaped holder or a lantern. This is much safer than lighting fires outside in the summer.
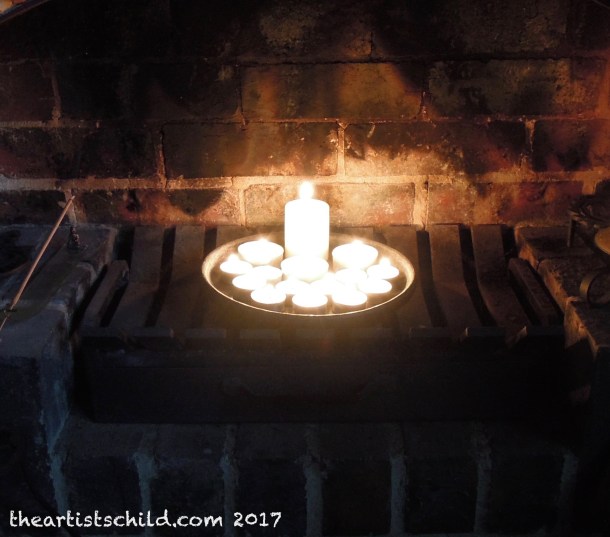
Inside you must be especially careful with naked flames. I like to put candles or incense in our fireplace for safety and any smoke will go up the chimney and not set off the smoke alarms. I can leave these without worrying that the house will burn down. If you have a fireplace candles look great in summer.
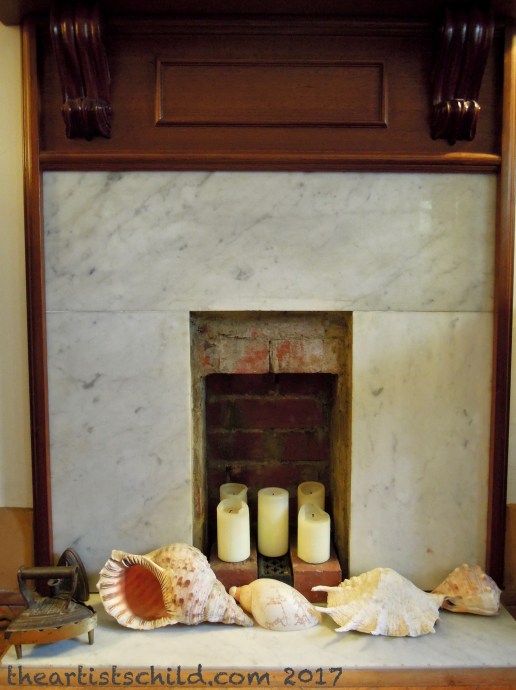
In our front living room there used to be an old gas fire that became dangerous so we had it removed. There was now a shallow hole in the double brick wall. We wanted to fill this with a simulated log gas fire but could not find one small enough to fit the space. We were left with a wooden mantelpiece with marble surrounds and a hole in the wall. A decorative screen has been hiding this for several years.
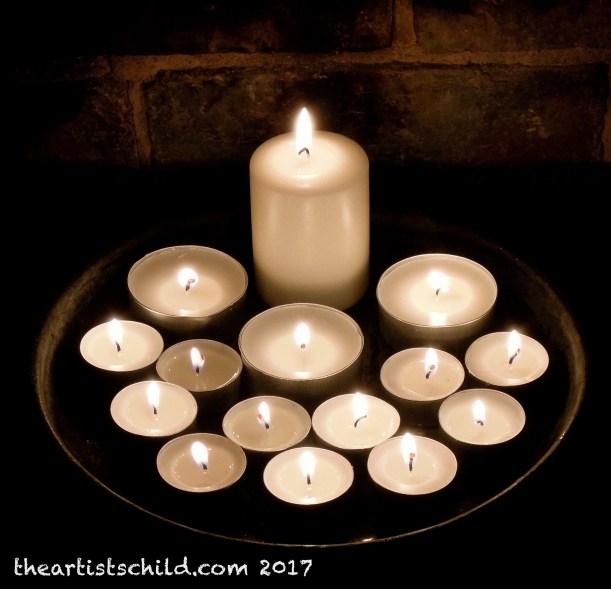
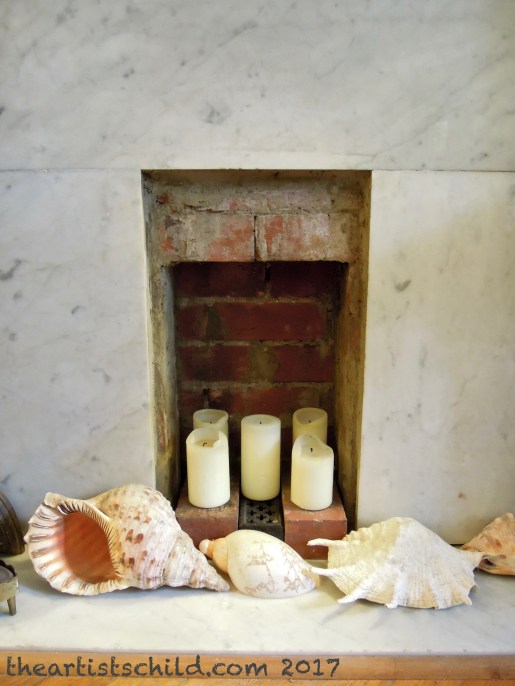
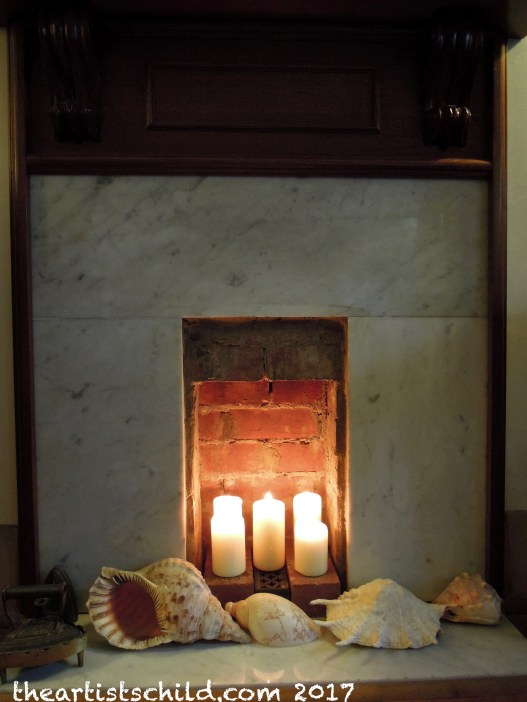
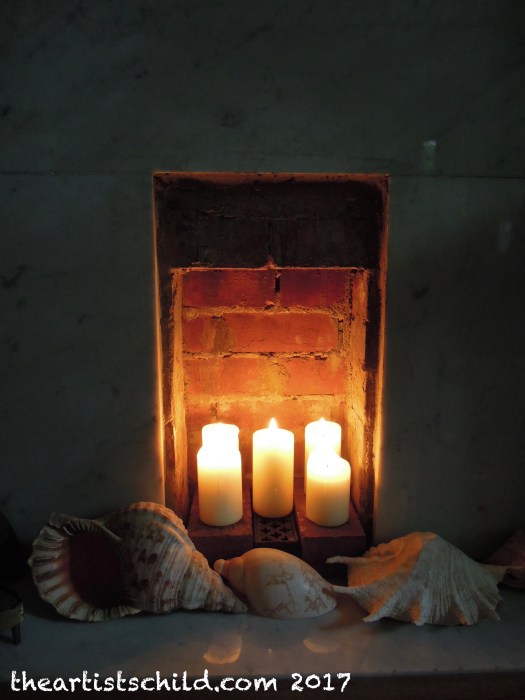
The creative mind can work in funny ways. On Christmas Eve I suddenly had a bright idea about how to turn the hole into a feature. It is so simple I could kick myself and wondered why I had not thought of this a long time ago. I selected a couple of used bricks left over from our renovations, as well as a very old decorative cast iron vent that came from some relative and placed these in the bottom of the opening. With the addition of several pillar candles we now had a niche that creates the effect of a fireplace without the heat. This is great for summer and will also look welcoming in the winter. I put some old shells (collected by an ancestor in the 19th century ) onto the hearth as a reminder of the sea.
There is a gap in the double brick wall at the top of the hole that acts like a chimney for the candle smoke so that this will not build up in the room. As the whole niche is made up of bricks with a marble surround, everything is flame proof. Pillar candles can build up a lot of heat so this is important. You should never put candles in an enclosed flammable space.
It would be quite easy to make a faux fireplace from scratch. I’ve seen examples on Google image search that can be as simple as a brick ledge against a wall with a wooden beam placed high above to act as a mantle. Old reclaimed mantelpieces can also be placed against a wall with a fireproof ledge in the opening to hold candles. Just make sure that any wooden features are far enough away from the flames so that the mantelpiece won’t catch fire. To limit smoke use slow burning natural candles like soy or beeswax.
If you have nowhere inside to safely light candles, outdoors you could create a niche against a stone or brick wall, turn a large rectangular concrete planter on its side or end, or put candles inside a chiminea. There are so many creative ways to make safe candle holders.
Turning that useless hole into something fun has raised my spirits. It is good to solve an annoying problem before the New Year. Ellie and I will be lighting our candles in the niche, as well as in the fireplace, to farewell the old and welcome in the New Year. We wish everyone a bright and very happy 2018.
Kat and Ellie
Looking through a long list of songs about candles on Google, the number one song and probably one of the most uplifting is Melanie Safka’s Lay Down from Candles in the Rain, that she wrote about the Woodstock music festival in 1969. As it is the summer season of music festivals in Australia, here is a live version she performed on Dutch TV in 1970 with the Edwin Hawkins Singers, where she also tells the story of the song.
At this time of the year I always like to cheer up our home with some Christmas decorations and try to be a bit creative by reusing old ones in a new way. I wanted a change from the music stand tree we have had for the last few years but buying a new one was the last thing on my mind, as recently Ellie and I have had a lot of expenses after dealing with our mother’s funeral costs. So what to do for a change without spending any money, as well as sticking to a recycling ethic?
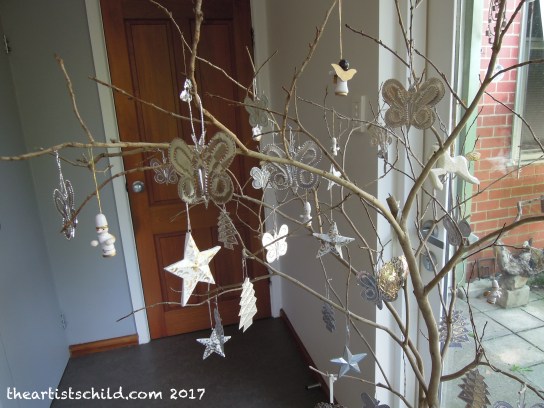
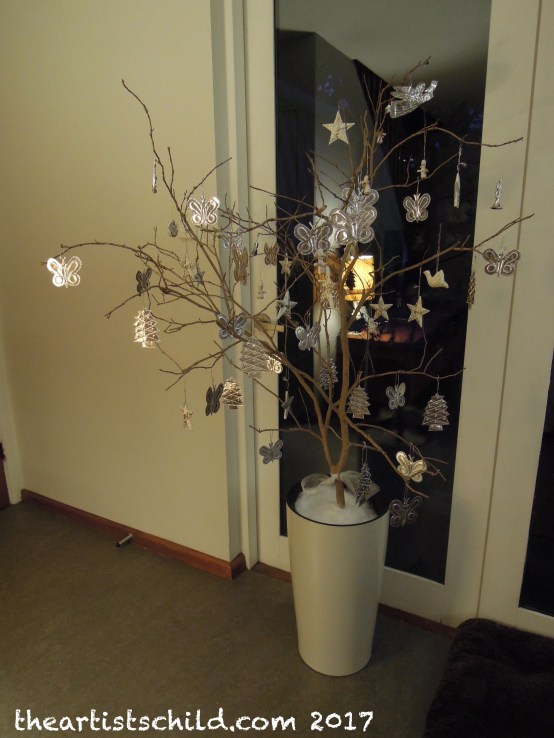
I remembered that several years ago a small potted camellia tree had died because the roots had become pot bound and we left it too late to replant. It was a lovely shape so I cut off the dead roots and leaves and put it in the studio for a while to display some bird nests that had fallen in the garden. When I became tired of the clutter I put it in the roof because I did not want to throw it out. After some careful maneuvering I managed to get it out of the roof in one piece. Once the spider webs were removed I could see that it would make an interesting Christmas tree. If you have any trees with dead branches that need pruning these would work as well.
All I needed was a container to stand it in and found that it looked good in a white indoor plant container that we already had. Anything reasonably large would do like a ceramic pot, a vintage milk can or a huge glass jar or vase. I decided that as the planter had a wide opening I would put a narrower container in this to hold the tree in place. What to use that was the right size? I came up with a unique solution using an old WWI brass mortar shell case. Not something that everyone has kicking around but a tall jar would also do the trick. I put marbles around the tree trunk to stop it from wobbling in the shell case (you could also use small pebbles or sand) and packed newsprint paper around the container to stop it from falling over in the planter. A layer of white polyester stuffing for toys etc., that came from our craft supplies was used to cover the paper and hide the shell case. It simulates snow. Anything fluffy and white could be used, like cotton wool or you could use sand or pebbles, depending on your theme.
Now it was time for the fun of decorating the tree. I used the same decorations that had been on the previous tree, but added a mass of aluminum butterflies that were in storage. All of these were bought on sale. Because I try to stick to a colour scheme of silver, white with a touch of gold, it is easy to add or make more matching decorations. We also have some large silver glass balls, but with dogs this is risky because they will go for any baubles of this shape. I don’t want to have these crashing to the floor and smashing into tiny smithereens so left them off the tree.
With stars, angels, tiny Santas and musical instruments, the silver fir trees and butterflies, a peace dove and a white horse, the tree looks really great. We don’t have any suitable Christmas lights, but at night the silver decorations really reflect any light in the room and the tree glows. These also reflect the bright sunshine of a summer’s day.
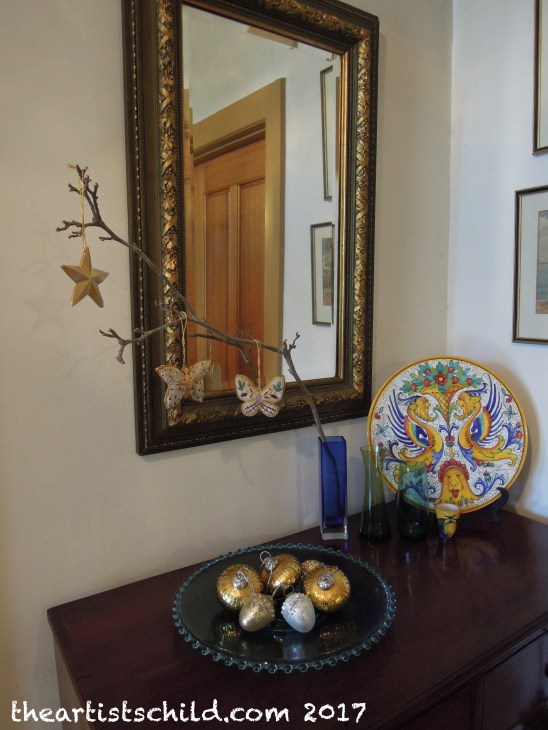
In the front hall I did something similar by hanging a star and some embroidered butterflies on a single branch sitting in an ultramarine blue glass vase. Gold and white glass ornaments were placed on mum’s vintage aqua glass platter. The decorations look lovely with green and aqua vintage glass vases and a colourful Italian hand painted platter. These were found at op shops or were gifts. Again I just used what we had already.
On the front door I hung a wreath made from a plaited straw circlet that had once been part of a Swedish Christmas mobile. I decorated this with some green and cream ribbon that came from a florist’s arrangement. It looks summery and cost nothing.
Reusing old stuff is a fun and inexpensive way to make the festive season brighter. Nature is also a great supplier of tree materials and decorations, from dead branches to evergreen leaves. If these can be found in your own garden so much the better. You can also put any vegetable matter back into your garden as compost or mulch.
Just because you don’t have a lot of money does not mean you can’t have a beautiful and fun celebration. Never forget that your creativity is beyond price.
Kat
One of the best Christmas songs is How to Make Gravy by Australia’s Paul Kelly. It is happy, sad and touching all at the same time. Here’s a live version.
Over the past ten years in Melbourne the festival of Halloween has become more widely celebrated and seems to be getting more commercial with large public events in many shopping centres. The St Kilda Town Hall even has a hugely popular Haunted House experience. We are increasingly getting Halloween themed catalogues in our letterbox advertising elaborate and expensive decorations and costumes, as well as the usual treats. Before all this commercialization most local Halloween celebrations were limited to home parties where decorations and costumes were usually homemade and trick or treating was rare.
Magazines used to be the main source of ideas for making party decorations and costumes. We have that really old party magazine from the 1890s, mentioned in a previous post, which has a wonderful section on Halloween, as well as the more recent Australian Women’s Weekly Home Library publication, Perfect Parties. No one was expected to spend a fortune and it was so much more fun and creative to make things.
As children Ellie and I had a Halloween Party. As there was little available in the way of decorations, except for plastic spiders and orange and black balloons, we invited some friends for a sleepover before the party and had a great time making decorations for the family room and garden. Out of black card we cut black cats, owls, bats, broomsticks and the like and hung these from sticks of bamboo to create mobiles.
A neighbour’s black cat
In one corner of the garden we built a witch’s house against the side fence with a sheet of corrugated iron for the roof and bamboo poles (cut from the garden) tied together with twine to form the walls and a window. We painted a sign that said “Witches Hollow”. In front of this structure dad made a tripod from wooden poles and hung a cast iron camp oven for a cauldron over some unlit wood. These days you can have a fire in a metal fire pit. Probably one with a wire safety grill is best to protect from dangerous sparks.
Cast iron camp oven
Metal fire pit
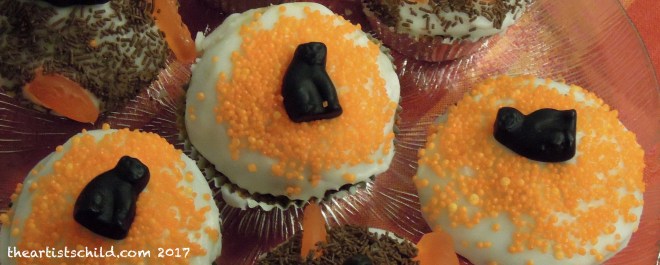
A decorated table is a wonderful centrepiece for a Halloween party. You don’t need to buy special tableware. Our grandmother gave us a vintage tablecloth with embroidered black cats, but you could make a tablecloth from orange fabric or just use orange crepe paper decorated with cutout black cats, bats, owls etc. She also made us a beautiful cake decorated with black cats. It is easy to make cupcakes and decorate these with black cat sweets, jelly babies and snakes, together with orange or chocolate sprinkles on plain white icing. There are so many creative ideas around for making Halloween food these days, especially online. Fresh fruits and vegetables, like pumpkins, turnips and tomatoes make great table decorations and are a reminder of the autumnal origins of Halloween, even if it is spring here. And you can use them to make a soup or put them on the barbeque after the party.
Black Cat Cupcakes
Only recently in Australia has it been possible to get large orange pumpkins to carve at Halloween. Supermarkets now have these to buy for the occasion. We had to make do with the green kind. Our grandfather carved a jack-o-lantern out of a pumpkin and fitted it with an electric light bulb to put on the front veranda. He also had a very old papier-mache mask of a skull and put a bulb in this as well. They looked wonderfully spooky to welcome the guests. Now front porch decorations seem to be becoming more elaborate and more common here, but you don’t need to buy frightening manikins that cost a heap. A homemade scarecrow could look just as creepy especially if you give it a scary clown face.
Most people who came to our party had homemade costumes. I created one from a long white satin bridesmaid dress that I had worn the previous year. Over this I wore a filmy pale blue robe of my mothers and made a cone-shaped hat from white cardboard, stuck on some gold stars, attached a filmy white scarf from the peak and stapled some hat elastic to keep it on. With a wand made from a piece of silver painted dowel I was a Sorceress. Mum made Ellie a skeleton costume by sticking white electrical tape to a black polo neck top and tights.
Guest’s costumes ranged from the usual witches or ghosts, to someone dressed as a pea pod with green balloons for the peas. There were some very creative costumes, such as a hand painted skull and crossbones outfit and a witch doctor, who had lots of small handmade mojo bags attached to a belt. I remember we all had a great time dancing to pop music and playing Murder in the Dark, which still seems to be a popular party game. Of course there were prizes for the best costumes and little bags of treats for everyone to take home.
With a bit of creativity you can avoid a lot of the cost and over commercialization of Halloween and still have a great party. And if it is for just for adults, substitute more appropriate food, drink and entertainment. Be as crazy as you like. Why should kids have all the fun?
Kat
Probably one of the best songs ever written about a ghost is Kate Bush’sWuthering Heights. The famous “red dress” video of this song has had many millions of hits on You Tube so here is the “white dress” version.
It’s October again and in Melbourne we are now in the middle of spring. As I mentioned last October when I started this blog, we have the strange combination of the Spring Racing Carnival and Halloween celebrations. There is nothing more typical of Melbourne than scenes of costumed witches, wizards or zombies mingling with the more traditionally dressed amongst the stunning roses at Flemington racecourse on Melbourne Cup day.
Over the last two weeks I have been busy doing some badly needed gardening. At this time of year the air is sweet with the smell of blossom. Our garden is full of the fragrance of wisteria blooms, which cascade from the branches like waterfalls of white flowers. They are fragile and could be easily destroyed by a spring storm so I have taken photos to remember their beauty.
With all of nature’s exuberance it seems strange to embrace the autumnal mood that surrounds the festival of Halloween. One of the disadvantages of living in the Southern Hemisphere is the topsy-turvy nature of traditional festivals. But at least daylight saving gives us longer hours of light in which to party during these celebrations.
Fun costumes make both race days and Halloween parties more enjoyable. I am a big fan of DIY costumes for both the creativity and uniqueness. As I have mentioned before, you don’t need to sew or spend a lot of money to wear a great costume. A good eye for a bargain and for reworking existing items is invaluable. In the past I have created my own Halloween costumes from clothing found at op shops (thrift or charity stores), weekend markets and by using fabric offcuts, cardboard and paper scraps to make accessories.
Illustration by George Cruikshank for The Witches Frolic by Thomas Ingoldsby
Items that can be reused with different accessories are worth collecting so that you will never be stuck for a costume idea. Witches or wizards costumes are a favorite for Halloween and easy to create with black clothes. Using the same long black dress and a charcoal grey cape found at a weekend market, I can transform into the medieval witch Morgan Le Fey or Samantha Stevens from Bewitched wearing her flying costume. All this requires is a change of headgear.
For the Morgan Le Fey costume I made a type of hat known as a Hennin (seen in gothic paintings) from cardboard covered with black silk fabric and gold paper. It was decorated with gold braid, glass jewels and gold glitter glue from a craft store. I pinned an old black silk scarf as a veil from the top of the hat. To turn the outfit into Samantha, a blonde wig (try to find a better one than mine as it itches) and a witches hat from a party shop are all that is needed to change the look. Black boots complete both costumes.
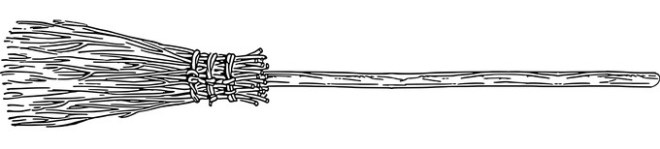
A simple way to make a witch’s broomstick is with a length of thick dowel and a pile of flexible twigs or thin bamboo (whatever is easiest to find). Just divide the twigs into four equal bundles and tie each securely with some twine. Place the bundles around the dowel and wrap them all tightly together to form the broom. You can wrap ribbon, fabric or raffia over the twine to hide it. Then you’re ready to fly.
Whether it is spring or autumn, these are great seasons for festivals and celebrations before the weather gets too hot or cold. And if you live in the Southern Hemisphere or a tropical location, enjoy the contrast of the light with the “Darkness” of Halloween. You will have the best of both worlds.
Kat
Ukulele virtuoso, Taimane Gardner from Hawaii, taps into the Halloween mood with her haunting instrumental, Rings of Saturn, although she lives in the tropics.
The human brain is strange. Sometimes it allows you to see things and sometimes it doesn’t. You can look at an image for ages and not really observe it clearly and at other times you can see things that aren’t even there. This can be both annoying and great for your creativity.
In my last post I put up several photos of Ellie’s and was so focused on the images that I did not notice there were some hand blurs at the edges of some of the pictures. It was not until I saw the photos on a larger screen that I saw the problem, which I have now corrected. I was so busy looking at the main scene that I could not see this detail. Sort the opposite of “not seeing the forest for the trees.” It was a definite case of selective vision that can happen to all of us at times.
This got me thinking about the way we see things. If you want to go into the art history and cultural side of this John Berger’s seminal book Ways of Seeing (1972), based on a BBC TV series, is a good place to start. What I’m talking about is more from the personal creative side. One person can look at the same thing and see something totally different and our individual vision is what gives us original ideas.
I was looking at some of Ellie’s old photos and found the one at the top of this post. It was accidentally snapped when she was holding her phone and she had completely discounted the shot. But I saw this as a wonderfully evocative image with her hair floating out from the dark silhouette of her hat against the bright cloud filled sky. She saw it as a mistake but I saw a quite beautiful scene. Always take another look at what you have done. You might be surprised.
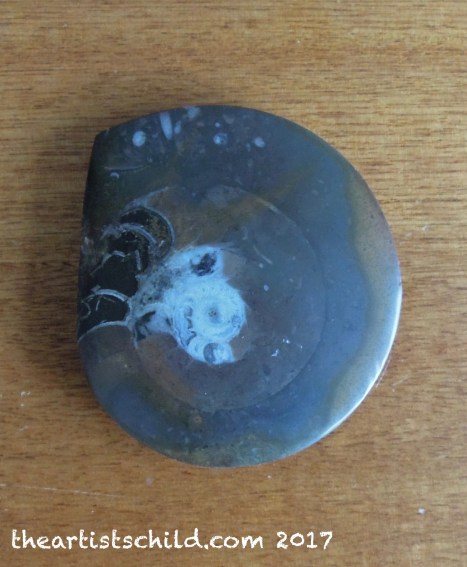
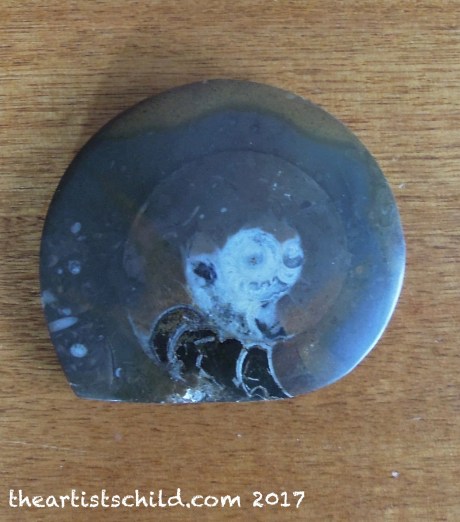
Ammonite Fossil
Seeing things in another way can provide inspiration. We have an unusual polished ammonite fossil that was bought on a holiday as a memento. It was not chosen because it was the perfect specimen, but when you view it from a particular angle it looks like there is the head and torso of a Shakespearian Gentleman wearing a puff sleeve jacket and a neck ruff. Can you also see him?
This ability to see things that are not really there can lead to interesting artwork. I have a small piece of driftwood, that when you stand it vertically, is like a tree that resembles a figure. This inspired the following ink drawing in my sketchbook.
Dryad, Pen and Ink Drawing by Kat
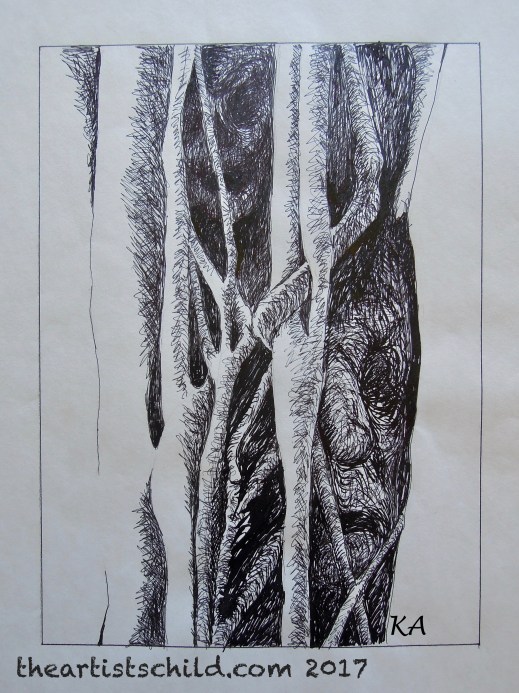
The brain often sees figures and faces in trees and foliage because we are wired to recognize the human form from birth. Using this concept I did a pen and ink drawing of the imaginary faces that I could “see” in the trunk of a vine-covered tree. It is called Spirits of the Forest, and depicts some of the scary and strange beings that may be encountered out in wildness of the Australian bush.
Spirits of the Forest, Pen and In Drawing by Kat
The human mind is sometimes selective and we can miss seeing the obvious but it can conjure up all kinds of images if we see with both our eyes and inner vision. Just keep looking.
Kat
A great feel good song is I Can See Clearly Now. Jimmy Cliff did a terrific version in the 90s but I also love the 70s original by Johnny Nash.
Sometimes you imagine that you need to find inspiration in exciting far away places. You know, that “the grass is always greener on the other side of the fence.” It is wonderful to travel but it is not always possible and inspiration can be closer than you think. Your local area can be full of inspirational locations if you take the time to look. Often when you visit the same location over and over it can be a great source of creativity.
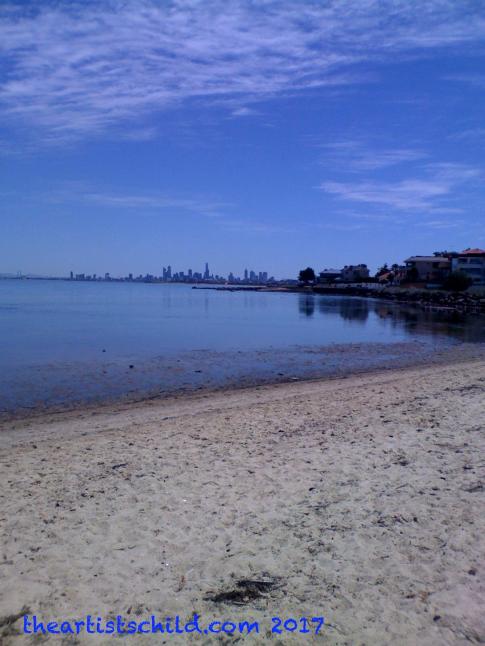
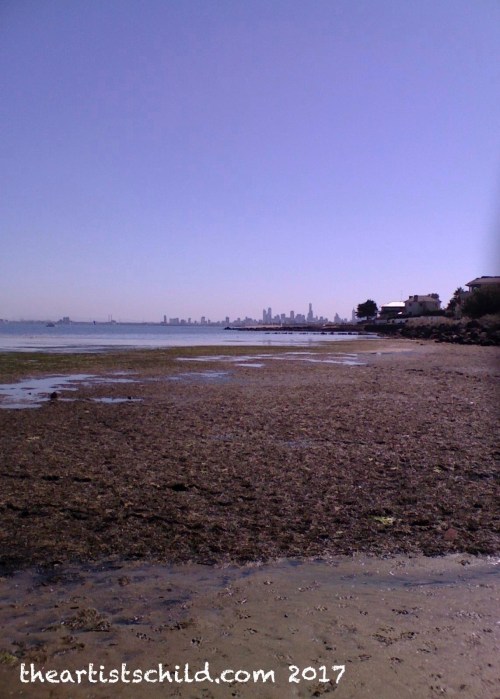
We don’t live far from Port Phillip Bay and one beach in particular has been a source of inspiration. At various times over several years Ellie recorded this beach on a simple phone camera. This series of images show the changes of season, light and mood, often from the same angle. Such a location never stays the same and can keep giving you new ideas. There are pictures of the scene with a sandbar, still water, and the exposed rocky shore and at different times of day. Sort of reminds me of Monet’s obsession with Rouen Cathedral that he repeatedly painted under various light conditions.
In each of these photos you can see the City of Melbourne’s skyline, which is ever-changing. A couple of the images are from 10 years ago and there are now more tall buildings that can be seen from the beach. The beach itself has undergone development with new board walks and is less peaceful than it once was so it is great to have it frozen in time in these photos.
S/W Ver: 96.66.76R
S/W Ver: 96.66.76R
It is also inspiring if you can collect interesting items for your creations at a favorite place without damaging the environment. The same beach has provided me with interesting material for some of my found objects that I have in the studio. Over several years Ellie and I would pick up sea glass of various colours from this beach. A vintage milk bottle was filled with white glass to give it a milky appearance and I arranged a lot of the coloured glass in layers in a large old spaghetti storage jar to form an interesting sculpture. It sits on my work table and the light from the windows makes the glass glow.
Other bits of archeology are washed up on the shore. Fragments of old patterned china and earthenware look wonderful in interesting old glass jars. Did these shards wash into the bay from storm water drains or were they tossed from ships? It seems that eventually all rubbish will end up on a beach somewhere and some of it not good. At least these items do not affect the eco-system and can once again become something to enjoy. You never know what you will find.
Whether you live near the sea or a lake, a park or nature reserve, hills or mountains or a desert, there is sure to be some special place that will keep attracting you. Don’t ignore your local environment. Familiarity does not have to mean contempt. It’s all about paying attention to details and changes, which are in themselves inspiring.
Kat
I have included my favourite 80s beach song (I love that era for music). It is one of the few girl beach songs, as most of them are by boys. Echo beach by Martha and the Muffins is full of nostalgia and is about enjoying the beach on your own as a place to escape the rat race.
Creativity isn’t just about making art. It is also about solving problems. Sometimes you come up against an obstacle in your life, whether physical or mental, that seems impossible to remove so you must find a way around it. This may involve a bit of rethinking of the situation to find a satisfactory solution.
In some ways we create our own obstacles with thoughts like “I must wait until this or that happens before I can do such and such.” I know I am guilty of this type of thinking at times. Dishwashing is my least favorite housework activity. It never stops and I would rather use the time for creative activities. Before we had our renovations several years ago we could not fit a large dishwasher in our kitchen. We previously had a bench-top dishwasher that had given up the ghost and the brand was not longer available. We thought that we could not get a new dishwasher until we had renovations, which still required a few more years of savings.
A friend who was renting a house said that this was stupid and we were putting up unnecessary barriers. She had bought a second hand mobile dishwasher that could be attached to a tap without it needing to be permanently installed. We did not have the space for this so looked around and eventually found one made for caravans and put it on a shelf near the sink. This worked well and when we finally had our renovations we sold it to someone who needed a small bench dishwasher for their workplace. So our problem was solved and we got around an obstacle that was driving us crazy.
Old Kitchen Shelves
Lack of money is often an obstacle to doing things but you can usually work your way around this problem. Still on the subject of renovations, our finances did not extend to putting in a new bench and a linen cupboard in the laundry. It previously lacked a bench and had some large old wooden shelves, which took up too much space. We reused an Ikea stainless steel bench and some industrial metal shelves that were in the old kitchen, together with an Ikea drawer unit on wheels that had been in the laundry. With a new marmoleum (linoleum) floor and freshly painted walls the room looked more spacious. Reusing existing items gave us what we needed. Just because you don’t have the money does not always make a situation impossible. A compromise can work well.
Old kitchen bench
When in the middle of any kind of project you can run into problems and these should never be an obstacle to getting it finished. Just think of Michelangelo. When he was carving his figures he sometimes came across flaws in the marble and would have to adjust the composition accordingly. We might not all be Michelangelo’s but we can take a leaf out of his book and think on our feet if some difficulty pops up in the progress of our work.
Seeing beyond an obstacle is sometimes what is required to solve a problem. After playing my ukulele and singing before an audience for a while, I suddenly developed stage fright and became extremely nervous. Performing was now more stressful because of anxiety. I knew this was ridiculous as I really enjoy singing so looked up ways to cope on the Internet. As with most skills in order to build confidence you must practice and practice so that you know your material thoroughly. If I imagine the audience as friendly and ready to be entertained, I can look beyond my anxiety and have fun. I will never be able to get rid of my nerves completely but they can be used to increase the energy necessary for a good performance. Now I can control them rather than the other way around and I look forward to performing.
Even if you cannot remove an obstacle it need not become a huge barrier in your life. Try to work around the problem, be flexible and use creative thinking.
Kat
As a child one of my favorite performers was Jerry Lewis. I loved watching his films on TV. He was a comic genius and always seemed to be confronted with some kind of obstacle that led to hilarious situations. I like this scene from The Bellboy (1960), which uses visual comedy to great effect.
We all need some kind of tools to be creative. For those who work with their hands these can be simple or complex depending on what you do. Often due to lack of money or availability art and crafts people have needed to make their own tools and equipment, which has led to some imaginative solutions. I have made some simple examples myself because of the expense or if I could not find something suitable. It is good to be inventive.
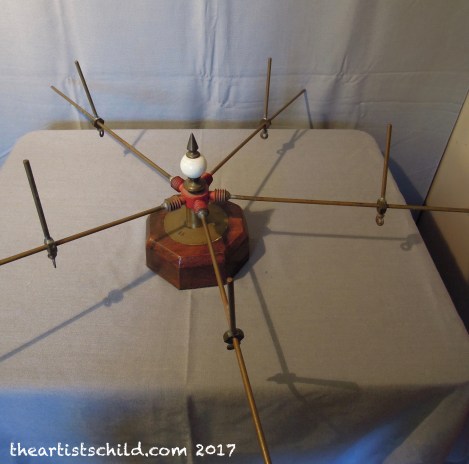
Looking at homemade inventions from the past can be inspiring. I have a very old metal yarn winder (a swift) that was inherited from my grandmother. I don’t know where it came from but it was obviously homemade by someone who knew how to use a soldering iron. It is made up of an old curtain rod finial, a metal nut with screw holes on a brass and wooden base, screw-in horizontal brass rods that have vertical brass rod attachments to hold the yarn. Someone went to a lot of trouble to make this winder, probably at a time when they were difficult or expensive to buy. It is quite an ingenious solution to an old problem and might have been created by someone who was sick of holding the yarn as it was wound into a ball.
Everyone who works with yarn needs some kind of winder. I had a look on Google image search and many craftspeople still come up with interesting DIY yarn winders using a variety of materials, from old coat hangers to collapsible wine racks. It is good to see in this consumer-oriented day and age that the inventive spirit is alive and well.
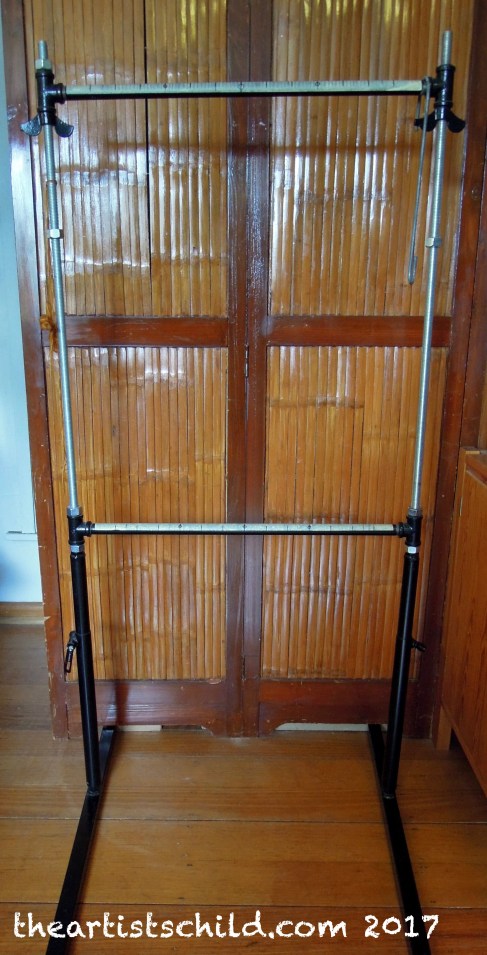
This sort of inventiveness has led to home cottage industries. While I have made my own basic wooden frame looms, I needed a larger adjustable loom for tapestry weaving and found one made be a local man who made these from basic plumbing supplies for a reasonable price. He started out making one for his wife who was a tapestry weaver and others liked his design so he made them for students.
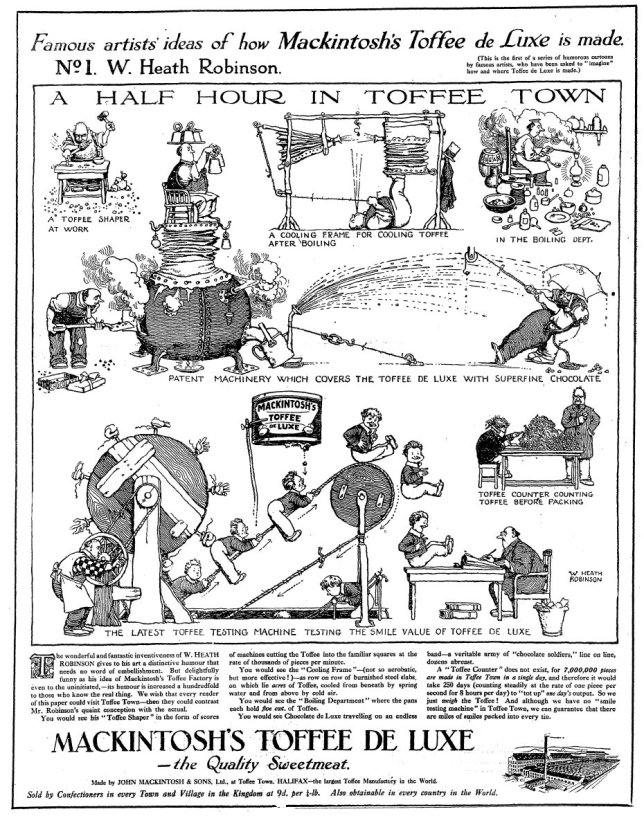
When creating your own equipment try not to get too bogged down in detail. The great illustrator W Heath Robinson was famous for his hilarious drawings of ridiculous inventions and contraptions. These made even the most basic of processes complicated. There is no need to go down this route and it is best to simplify as much as possible.
Mackintosh’s Toffee Advert, Illustrations by W Heath Robinson, Public Domain Image, freevintageillustrations.com
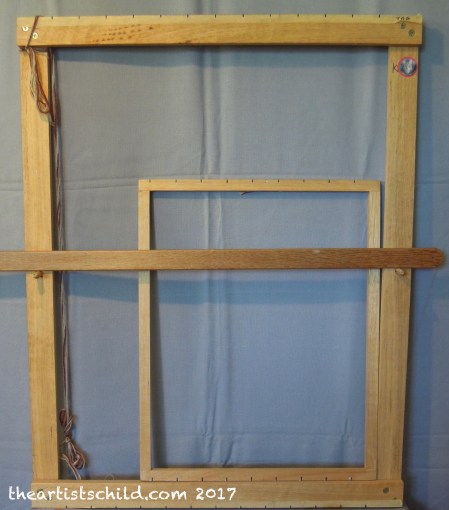
With very basic carpentry skills you can make all kinds of things with a drill. I made a basic tapestry frame loom shown in a previous post. If you get the wood cut to size at the hardware store, all you need to do is screw it together. I inserted a couple of dowel pegs on each side of the frame to hold a narrow wooden crossbar so that I could suspend my design behind the warp. This made it easier to transfer my designs onto the threads and was an improvement on a simple frame.
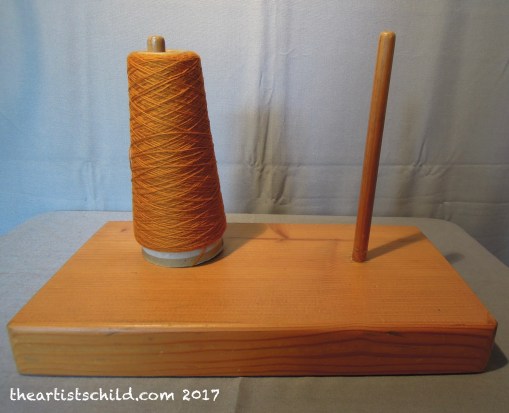
Ellie also made a pegboard for holding cones of yarn so that it was easy to wind it onto bobbins for tapestry weaving. She just used an off-cut of Oregon pine left over from our arbor and drilled holes for a couple of pieces of dowel. Then she sanded the whole thing and coated it in varnish. Didn’t cost a thing because we already had the materials.
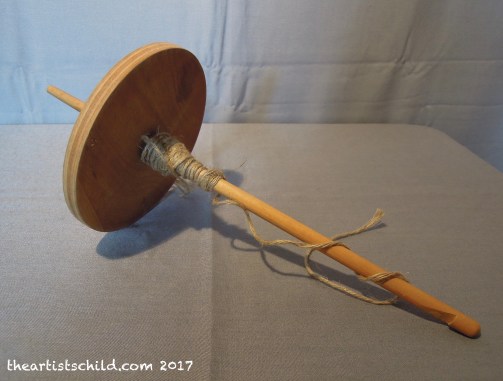
Sometimes you want to try out a craft but do not want buy expensive equipment, especially if you don’t know whether you will like it or not. This is a good time to create you own. As a part of learning about the weaving process I tried out spinning with a drop spindle (How to video). Luckily a relative who had done this in the past gave me her spindle. It is of very basic manufacture and if you had access to the right cutting equipment you could easily make your own. It only requires a short section of dowel and some thick plywood. Here is a link (How to video) that shows you how to make a similar spindle from scratch or with pre-cut discs.
But there are always even simpler ways to make tools when you look on-line. It is possible to make a workable spindle using a couple of CDs, a piece of dowel, small hook, some glue and small rubber rings (here are the instructions for those interested).
Finding cheaper alternatives to expensive items is a clever way to learn a new technique. With spinning, the wool needs to be combed (carded) and formed into rolls (rolags) before it is spun. Some ingenious craftspeople worked out that it was possible to use slicker dog brushes instead of costly hand carders for this process. These are a fraction of the price. They might not be quite as good as the proper equipment but are ok for the beginner. I was glad that I had learned something about the spinning process without spending a fortune as I prefer to concentrate on the weaving with ready-made yarn.
Sometimes you don’t want a big piece of equipment cluttering up your workspace especially if you will not use it often. That’s when you need to think creatively. I needed to be able to draw up large designs for tapestry but did not want a large, expensive drawing board table. So I went to the hardware store and had a large sheet of melamine fibre board cut to size. I can put this on my easel to draw and then put it away against a corner wall of the studio for storage. It did not cost much and saves space.
When you can’t find just the right tool it is time to make your own. I wanted a mahl stick. This is a piece of dowel with a padded end that is used for resting your painting hand against when working on fine details. It is essential that padding does not touch any wet areas of paint or cause dints in the canvas surface so it is best that this rests on the edge of the painting. At the time I could only find ones with a short shaft and wanted one for larger sized works so I made my own. All I needed was a long piece of dowel, a champagne cork, some felt, twine and glue. It works really well and I enjoyed some sparkling wine in the process.
A tool can be made from anything if you use your imagination. For textural work with ink or paint I have used all kinds of things to create my own tools. Corks, sponges, a jagged cut toothbrush, pieces of carpet, homemade bamboo pens, disposable chopsticks and skewers can be used. An emery board is great for sharpening charcoal pencils to a fine point. They are so many things that can be employed as a tool.
Whatever your art or craft, it is great to make your own tools and equipment. Being inventive is part of the creative process and what you make can be as basic or as complex as you like.
Kat
It is wonderful to use your imagination. Here’s an oldie but a goodie by Gladys Knight and the Pips.
Times change. What can be fashionable in one century can seem really peculiar in another. This is especially true of types of entertainment. We have an old battered copy of a magazine called Social Evening Entertainments produced by The Butterick Publishing Co in 1895. It is full of ideas for social get-togethers that were popular in the late 19th century. This book has both motivated and amused several generations of our family. Some of the celebrations included are still relevant like Christmas, Easter and Halloween and there are some interesting ideas to inspire. There are others that are quaint or just plain weird.
Frontispiece, Social Evening Entertainments, 1895
Each party theme is told as a story with a family or group of friends deciding to hold a social gathering. We learn about the invitations, decorations, food and entertainment, through the eyes of the characters. This is why the magazine so delightful to read as you are taken into the lives of people over a century ago and learn a lot about the attitudes of the time. It is a work of fiction and a social history, as well as an instruction manual.
The Artist’s Studio Party got my attention because I was interested in how the ordinary person perceived the creative life in those days. You can read it for yourself below (just click on the image). The scene was set to create the 1890s idea of Boho, with the “garret” decorated with exotic rugs and Asian objects. A drawing game was played on an easel that could be a forerunner of Pictionary, with guests having to guess the object drawn. Wooden trays were cut into palette shapes upon which the simple but probably expensive food was served. There does not seem to be any alcohol provided so it does not bear much resemblance to a real artist’s life in that period. No Absinthe in sight. And the English walnuts served in silver paper paint tubes held together by glue and dabbed with possibly toxic paint were likely to poison the guests. This type of entertainment is a wonderfully naïve depiction of the artistic life and must have provided a lot of fun for the participants who were spared the reality of starving in a garret.
There seems to have been an obsession with instructional themes. Today the very idea of a Mutual Improvement Entertainment, an Evening with Familiar Objects or a Geography party would make people come up with all kinds of foolproof excuses for non-attendance. But these were obviously popular subjects back then before radio quizzes and TV game shows. The suggestions for the Geography Party are very detailed from globe-shaped invitations to scorecards for geographical guessing games and decorations. Further entertainment consisted of a geography match with two teams who competed by answering more geography related questions. The prizes included a gold metal Grecian style stick pin and silk and globe decorated Mouchoir Case (handkerchief case). Even the menu stuck with the theme. This is a party that you would need to study for in advance and can’t have been much fun for those with poor general knowledge about the world. Glad this type of event has died a natural death. Trivial Pursuit is much more fun.
Some quite odd party themes were for a Senses Party, a Jewel Party and a Poverty or Hard Times Party. In the senses party entertainments were based around each of the five senses with mystery substances to smell and taste, memorizing objects on a tray for sight, recognizing musical instruments for sound and touching unknown items while blind folded for touch. The sixth sense did not come into it, so no ESP games. Taste and smell did not always include pleasant things. To me the activities are a bit like some strange scientific experiment that you might never want to repeat. For a jewel party, the female guests were invited to wear as much of their jewellery as possible and to tell myths and legends about the type of stones they were wearing. It could have ended up being an occasion devoted to one-upmanship like todays socialites and celebrities walking the red carpet.
In complete contrast the Poverty Party was about entertainment without any frills. It was to show solidarity and sympathy for the poor. All items of good furniture, curtains and ornaments were to be put away, and replaced with blankets and plain linen on the floors. The hosts and guests would dress in old clothes, eat simple, homemade food and dance to music provided by local needy musicians. After the event the fabric and blankets were to be donated to the poor. I can’t help thinking that this theme is trying a bit too hard in the frugality department and it is all about the well off feeling good about themselves. Holding a public event for the local poor, who could not afford a party, with lots of food and fun would have been kinder and if you are experiencing hard times, who wants to be reminded of the fact.
There are some very quaint party ideas in the book that would have been time-consuming to produce such as a Logomachy Party. Logomachy was a word game with the letters of the alphabet on a set of cards. It is like Scrabble meets the old card game Casino. The guests were to take part in this game for entertainment. The party in the associated story was held in the springtime, so there were homemade flower shaped invitations and cardboard butterflies and flowers decorated the room and tables. Rabbit decorations were made from peanuts in the shell with brown paper ears. You don’t see a lot of peanuts at children’s parties anymore because of the allergy dangers.
The most unusual food item was the dessert: nests of whipped cream in shallow crystal saucers filled with coloured eggs made from wine jelly. Blowing the white and yoke out of real eggs created these eggs. The liquid jelly was then poured into the cleaned shells through a funnel. After it had set they were peeled to reveal the jelly eggs. This dessert would have taken a lot of patience and care to prepare, as the potential for disaster was ever-present. Jelly was very popular in the 19th century but I doubt that anyone would have the time to go to this much trouble nowadays.
While many of the social entertainments may seem out of date and rather boring in the 21st century, one can only admire the ingenuity and imagination employed in the creation of this book. It can teach us a lot about making do, recycling objects and materials and valuing the handmade over the mass-produced. There was also a great sense of community in those days where such gatherings brought everyone together, even the different generations. This is evident in an Old Folks Entertainment, where young people and their parents dressed in clothes from past decades, sang old songs and ate nostalgic food. Not dissimilar to modern 60s, 70s and 80s parties.
Hollywood party decorations
Hollywood party decorations: recycled tinsel, film negative strips, red scarf and 2$ shop feather boa, vintage glass head filled with gold fabric remnant
60s flower power party decoration, recycled fabric flowers from op shop and ribbon, white paper shopping bag with attached vintage note paper
Perhaps popular themes of today, like Hollywood or Hippie Parties, will seem bizarre to future generations. Whatever the period everyone enjoys a good party.
One of my favorite party songs from the past is Lionel Ritchie’s All Night Long. Love those 80s clothes and dancers. It is so joyful.
Wrens, Miniature Oil Painting on Canvas Board, from my realist phase
Artist’s Paints
In the previous post I discussed ways to save money on drawing materials. In this post I talk about ways to keep down the cost with artist’s paints that I hope others may find helpful.
The price of artist’s paints can be off-putting at times. It is a good idea, where possible, to use paints and materials made by local manufacturers, as these are less expensive than imported products. I find that sticking to a limited palette is also a way to prevent over spending. The main colours which I use no matter what the paint type are Titanium white, Ivory Black, Lemon Yellow, Cadmium Yellow Pale, Yellow Ochre, Alizarin Crimson, Cadmium Red Pale, Burnt Umber, Viridian, Cerulean Blue and French Ultramarine. Some brands use different names for these colours.
For work in visual diaries and designing textiles, gouache is a good water-soluble paint because the colour is intense, you can use it on dry paper and create defined images. To save money it is wise to prevent wastage of your gouache paint. I keep my gouache tubes in an old Tupperware container found at an op shop to prevent them from drying out and store this in a cool cupboard. I put out the colours from the tube into the compartments of a round palette kept in a biscuit tin and I use two inexpensive plastic palettes for mixing these paints. One is for warm colours, the other for cool ones.
If you mix a larger amount of a colour do this in a deep plastic palette with a lid or in small paint wells that can be stored in a disposable food container. When finished working cover all the paint holders with cling wrap before putting on the container lids. With traditional gouache (not the acrylic type) if the paint dries out water can be added and the paint is still workable like watercolour pans and can be used again. Taklon (synthetic) watercolour brushes are great for gouache and are less expensive than hair ones. These last for a long time if you gently wash them in a mild soap to stop paint build-up.
Fernery, Gouache on Paper, Woven Tapestry Design
For works on canvas the main types of paints are oil and acrylic. Artist quality paints can be very expensive together with the various brushes and equipment. There are also mediums for both oils and acrylics that add to the cost. So the whole process for both oils and acrylics can become complicated and expensive.
I like to use both paint types. In summer the slower drying properties of oil paints make them perfect in a hot climate. While it is wise to limit the use of solvents, you do need some type of paint thinner in the under painting. This requires lots of ventilation and it is easy to open a window and use the exhaust of an air-conditioner when the weather is warm. Oil paints are also easy to take outdoors and this is probably the safest place to use them. In the winter when it is too cold to open windows and use exhaust fans, acrylics are much safer and more pleasant to use than oils, as long as you are not in a very confined space, because all paints give off some type of fumes. The cooler weather means that they do not dry quickly and mediums can slow down the drying process. There is even a rewetting agent (Atelier Unlocking Formula) so after drying you can still rework small areas. It is also possible to use acrylics thinly underneath oil paint to reduce your exposure to solvents.
So how can you save money on these paints whether you use oil, acrylics or both? Firstly, as I said above, buy local products. You will save money and support local manufacturers. A beginner does not need lots of paints and equipment. I began using oil paints at school with only a few tubes of paint, basic brushes and small canvas-covered boards. Don’t be tempted to buy every colour under the sun or lots of brushes at first. You learn more about colour mixing with a restricted palette and it is easy enough to clean a small number of brushes as you go.
With regards to cleaning oil paint from brushes, don’t use a dangerous solvent. I use a cheap oil to clean brushes while I am working then give them a good wash in mild soap and warm water afterwards. But remember you must never mix non-drying oils like safflower or sunflower with oil paint, the latter being made with an expensive drying oil like linseed or walnut. First I clean the brushes with cheap sunflower oil to get rid of the paint, wipe it clean on a rag or paper towel, then I dip the brush in linseed oil and give it a good wipe to remove the sunflower oil. That way my paints are not contaminated with incompatible oil and I don’t waste a lot of expensive linseed oil on cleaning. Have two labeled jars with lids to contain small amounts of your cleaning oils and discard when they become too dirty.
As with most art materials, if you can find good second-hand paints and equipment, all the better. My wooden oil paint case came from a relative with a quantity of useable paint tubes, brushes and a couple of small bottles for a medium and linseed oil. A case makes it easy to transport the paints. You could also use a plastic fishing tackle case. As I use up the paint, I replace the old tubes with a local brand (Art Spectrum) and have slowly added to my brush collection when funds allow and have included some old pliers, which are great for opening stuck tube lids.
With oils you would need thinning and oily mediums, because unless you use a quick, wet in wet painting method, the paint must be built up in layers, progressing from fast drying to slower drying to prevent cracking. To simplify the painting process and reduce solvent use and expense, don’t use lots of mediums. I originally worked with artist’s gum turpentine as a thinner but it is very irritating for the lungs and skin. Odorless mediums and solvents still give me a headache and make me feel dizzy. I prefer a medium with some kind of odor because at least you know by the smell how much exposure you are getting.
An alkyd-based medium contains lower amounts of solvent and odor than turpentine. I use Art Spectrum Liquol. I’m sure that other brands would have something similar. It speeds up the drying of the first layers of paint and can be used for smoothing brushstrokes and glazing. You don’t need to use much and can add a little linseed oil to the final layer of paint instead of liquol. To reduce exposure I put a small amount of liquol in one of the metal containers that you can attach to your palette. I keep the lid on when not mixing it with the paint and if inside, the window is wide open and exhaust fan on. The other container holds refined linseed oil. No mediums are needed for the wet in wet method where you blend the paint quickly, usually in one session. Great for out-door painting and impasto effects.
When using fast drying mediums you will need to clean your palette after you have finished painting for the day or it will become encrusted with difficult to remove paint. To save paint, put any pure, medium-free colours onto an old china plate and cover this with cling wrap ready for to use at your next session. Oil paint stays wet for a while like this. Scrape off the unusable paint from the palette with a palette knife onto a paper towel and wipe it clean with a small quantity of linseed oil. Always wear powder free plastic gloves if you are doing anything messy with any paints and when cleaning your equipment because toxic solvents and heavy metals in paint pigments can be absorbed through the skin.
Acrylics are perfect for large canvases created in the studio. As with oil paint I use a good Australian brand (Atelier) to reduce the cost. Acrylic paint keeps well in pots or tubs, which are more economical than tubes when using large quantities. You can’t use water to thin acrylics as this weakens the paints binding properties and you will need painting mediums that control flow and viscosity. You don’t need lots of different mediums. Just use what suits your style. I work with two mediums, an all-purpose mid-viscosity clear painting medium for slowing down the drying time and blending paint and a low viscosity-liquefying medium for fine detail work (this can be used with airbrushes), but I think I will buy some of that unlocking formula to rewet paint. There are also mediums available for impasto and glazing, as well as drying retarders and varnishes.
It is best to keep acrylic brushes separate from those for oil painting. As with all brushes buy a few at first then add others as required and always wash them regularly. For priming canvases and large brush stroke effects, house-painting brushes are cheaper than artists. When mixing larger quantities of paint use a palette knife to save wear on your brushes.
As with all art materials, a way to save money is to make your paints last for as long as possible. For mixing small amounts of paint needed for a small, quick work, a large palette with tear off sheets is great because acrylic paint can be hard to remove when dry, but for slower works it is better to use a wet palette. These can be made from an old plastic tray, which is lined with several layers of blotting paper or blank newsprint. Wet the paper thoroughly then place a sheet of baking paper cut to fit on top. You can mix your paints on this surface and they will stay wet for a long time, using a fine spray of water to keep them moist. By covering the palette with cling wrap under some kind of lid made from a larger tray, the paint can be kept for several days. I found a plastic seed tray and duck taped a plastic sheet over the bottom holes to seal it. Upside down it fitted over my wet palette. After about a week mold may develop on the damp paper so you know it is time to replace the layers.
When mixing larger quantities of paint do this in disposable food containers with lids so that you have enough for the whole painting and it will not dry out. Any plastic food packaging is useful for mixing acrylics. With containers without lids cover the paint with cling wrap but you would need to use it quickly.
If you chose to work with just one of these paint types you would definitely save more money. I find that oils and acrylics each have their advantages and disadvantages and that is why I like to work with them both. Experiment with a limited number of paints to see what suits you and have fun.
Kat
The Painter is a beautiful song by Neil Young. Here is a video with some inspiring artwork.
Libertas: personification of the political libertas that distinguishes the free from the enslaved; Americana: the feminine noun or adjective referring to American culture.